Published on 20 November 2023 (Updated 29 February 2024)
What greater nightmare could there be for a printer or print project manager than to receive an e-mail from their client with the only prepress files to be printed… a Word or PowerPoint document containing pixelated images ?!
Yes, there must indeed be worse things. But let’s face it, this situation, unfortunately very common, is enough to drive any professional crazy to the point of tearing his hair out. Of course, playing the graphic designer’s apprentice is trendy these days, and this article does not condemn the practice. However, when creating pre-press files, it’s important to follow standard printing procedures – you can’t just improvise!
Please note, however, that the advice given in this article is not exhaustive. It is aimed at communication professionals who are not experts in graphic design (in other words, people who are not necessarily familiar with Adobe Acrobat or Adobe Distiller, for example), to simplify client/agency/printer relations. Purists in the profession will find that there are still many parameters to be considered… The various points set out below are therefore just a good starting point for creating ‘clean,’ professional pre-press files, ready to be sent to the printer or agency for checking.
Use only graphic design software for your pre-press files
For the graphic creation of documents to be printed, it is best to use professional DTP (Desktop Publishing) software such as the Adobe CS suite (Indesign, Illustrator, Photoshop), Quark (Quark XPress), or other equivalent applications; note that only Indesign and Quark Xpress are really suited to the needs of professional page layout. These software applications offer high-quality visual processing with a rich palette of tools for achieving everything the imagination suggests and everything professional standards require in terms of page layout and typographic rules. Designing business cards using Microsoft Word, PowerPoint, Excel or other office software, for example, is simply not an option!
These specialized software packages can be used to export high-resolution PDF files for pre-press (“ready to print”) of the highest quality for optimum results. PDF is still the standard file type most commonly used in the printing industry because it includes all the information required for professional printing (fonts, imported images, etc.) if it is adequately prepared. PDF therefore saves a considerable amount of time and money in the document production process. What’s more, it allows the printer to detect and correct any errors in the file directly, and much more quickly and efficiently than using native files.
Note:
Printers can receive and process source files generated by graphic design software (such as PSD, EPS, INDD or AI) as well as image files (such as TIFF, JPEG or BMP). This does, however, entail a number of constraints: the client must have compatible versions of the same software, must produce complete, assembled files, must export high-definition images that cannot be corrected, and so on. These are all complex points that risk reducing the quality of the files and the final post-print rendering.
It is strongly recommended that you only use software explicitly designed for page layout (Adobe Indesign and Quark Xpress, for example), as applications such as Photoshop and Illustrator were initially designed to meet other needs and do not allow complete processing.
Formats for pre-press files: don’t forget the bleed
Generally, pre-press files must be built to match the final format of the documents to be printed (e.g. creation of a new 55 x 85 mm document in Adobe Indesign for the creation of a business card which will have the same dimensions after finishing). However, for very large formats, the printer may ask for a proportionally smaller format, which he can enlarge himself as the document passes through the press. This poses no problem regarding resolution or visual quality, as large formats are generally intended to be seen from a distance. It also allows the graphic designer to work on a lighter file in terms of weight.
To obtain quality paper documents, a bleed of approximately 5 mm should be added to the pre-press files. A very important point is that this bleed should be removed at the cutting stage when the final format is trimmed: it ensures that no white border appears on the edges of a document should the paper shift slightly in the machines. For very large formats, the bleed can be increased or reduced depending on the machine fleet and the printer’s wishes, and this should be discussed directly with your agency or service provider.
Finally, the format must include a minimum inner margin of 3 mm from the cutting edge as a safety measure to avoid cropping any text during trimming in the event of the paper shifting slightly in the machines.
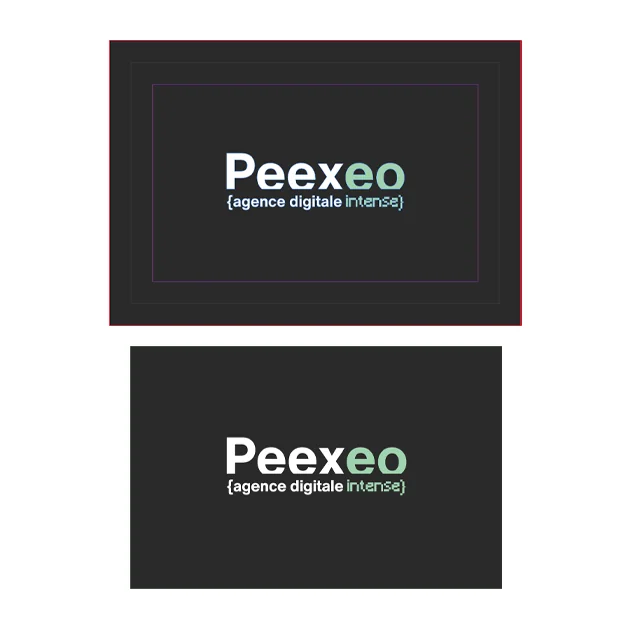
Example below: the creation of the business card in Adobe Indesign, with a 5 mm bleed on each side (in red) and a minimum 3 mm inside margin for the text (in pink). Bottom: final format after printing and cutting to size, shown in black on the top figure.
In Adobe Indesign and Illustrator
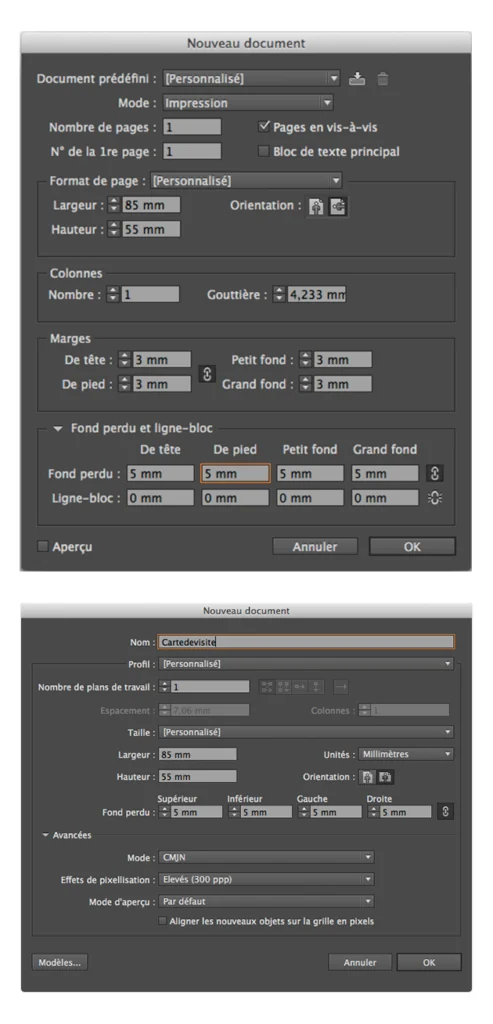
In Adobe Indesign and Illustrator, the bleed/edge settings are made when the document is created using the “File” – “New…” menu, or while the document is being created using “File” – “Document format…”. In Adobe Indesign, you can set the margins in the same places.
Example below: the creation of business cards, standard final format 85 x 55 mm. Top: settings in Adobe Indesign. Bottom: settings in Adobe Illustrator.
In Adobe Photoshop
It is impossible to set bleed and margins in Adobe Photoshop, simply because this software is not initially designed for making layouts but for retouching/working images.
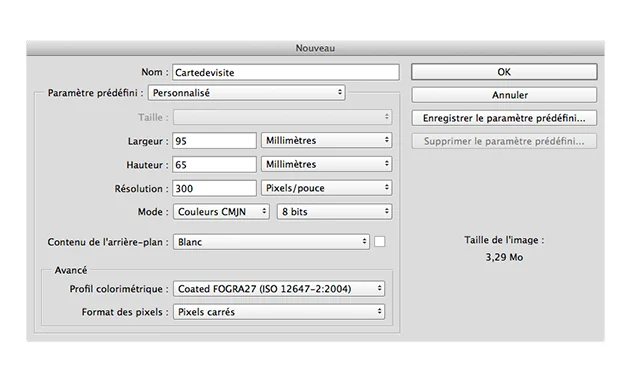
If necessary, you’ll need to manually calculate and add the 5mm bleed to the final dimensions of the document in the “File” – “New…” or “Image” – “Size of work area…” menu.
Example below: the creation of business cards, standard final format 85 x 55 mm. The format to be considered after adding the bleed is therefore 95 x 65 mm.
Choosing the right resolution and color mode for your prepress files
For optimum rendering, the image files imported into your layout documents must be in high definition. They should therefore be saved with a resolution of 300 dpi (pixels per inch), the conventional “high resolution” value. A lower resolution affects the quality of the printed image by making it less precise; conversely, a higher resolution is useless because the eye is no longer able to distinguish the difference in precision (we are talking here about image files, not line drawings). The resolution of very large documents can be lower, at around 150 dpi for example, so as not to weigh down the source files. A higher resolution is also unnecessary, as large formats are intended to be seen from a distance. In all cases, it’s best to seek advice directly from your agency or printer.
Finally, the imported image files and the colors from the color charts used must be converted to CMYK (Cyan Magenta Yellow Black, instead of RGB Red Green Blue). Any other colors (Pantone®, etc.) must be agreed with the agency or printer, otherwise, they will be confused with an editing error and also converted to CMYK before printing. During the conversion process, the color rendition can be modified to a greater or lesser extent. To avoid ending up with a yellowish invitation card instead of the creamy one you imagined, it’s best to work with CMYK color charts from the outset, carry out test prints and validate paper proofs (Bons A Tirer).
In Adobe Photoshop
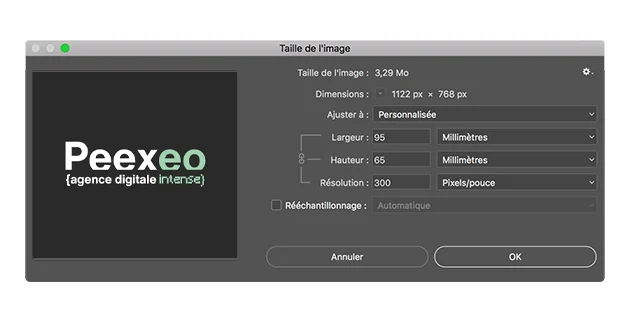
Any image or photograph used in any graphic design software must first be checked and reworked in Adobe Photoshop. To check the resolution of images, go to “Image” – “Image size”. You can convert images to CMYK mode in “Image” – “Mode” – “CMYK colors.”
In Adobe InDesign and Illustrator
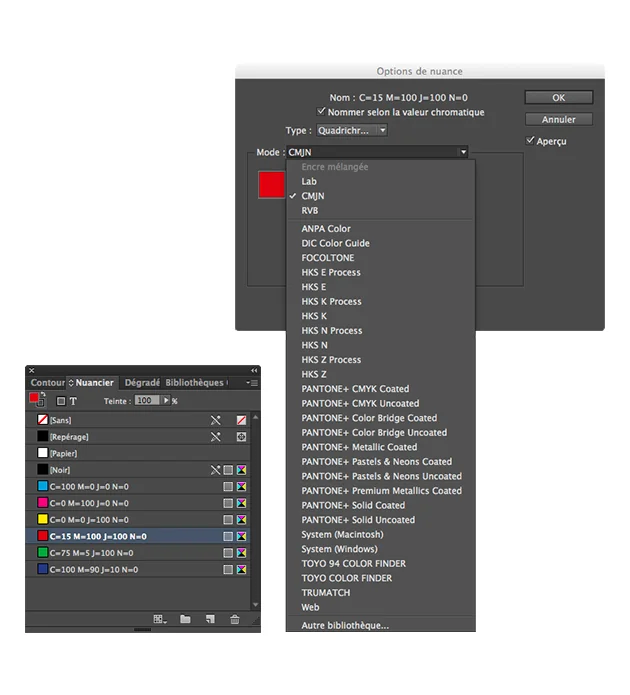
In Adobe Indesign or Illustrator, the conversion of colors used in CMYK mode is carried out directly in the color chart: open the “Window” – “Colour Chart” menu. Simply double-click on the shades to view their settings and convert them.
Flattening and vectorization: a security measure for your prepress files
To avoid as many editing errors as possible (fonts not included in PDFs, lack of precision, etc.), you can flatten layers and transparencies before generating the finished PDF. Similarly, you can also vectorize the text. Please note: these steps are definitive and cannot be modified afterward. We advise you to make copies before saving.
In Adobe InDesign and Illustrator
To vectorize text in Adobe Indesign and Illustrator, select the different text frames and then go to the “Text” – “Vectorise” menu. To be safe, we recommend copying the blocks outside the work plan.

In Adobe Photoshop
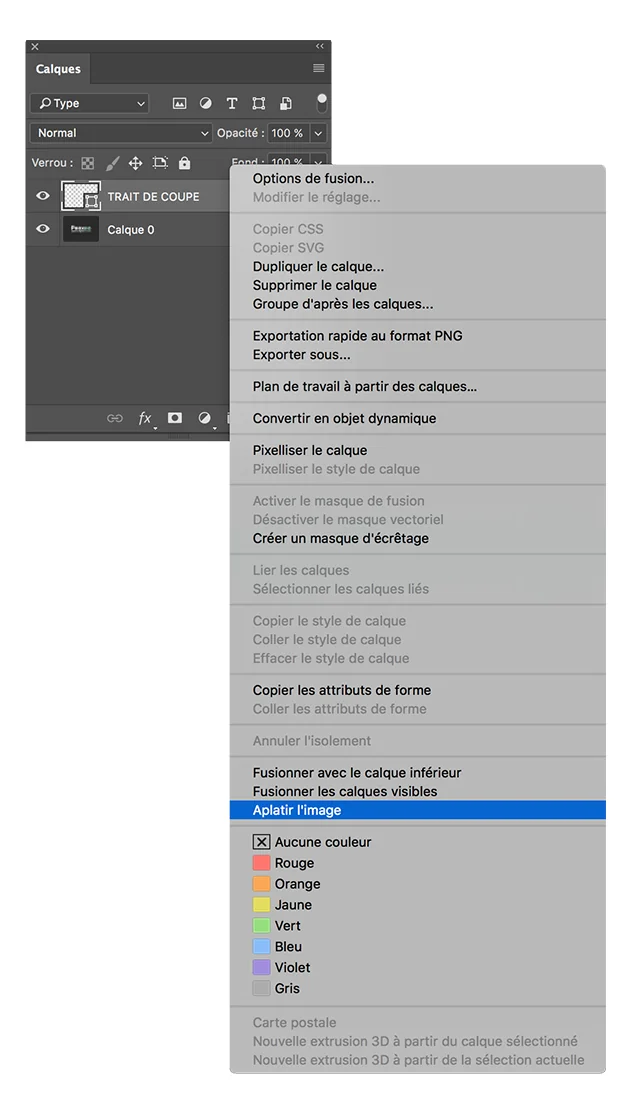
Photoshop layers can be flattened from the Layers window (“Window” – “Layers” menu to open it). Select “Flatten image” after clicking the options button in the top right-hand corner.
Print marks: if you export a correct high-resolution prepress PDF
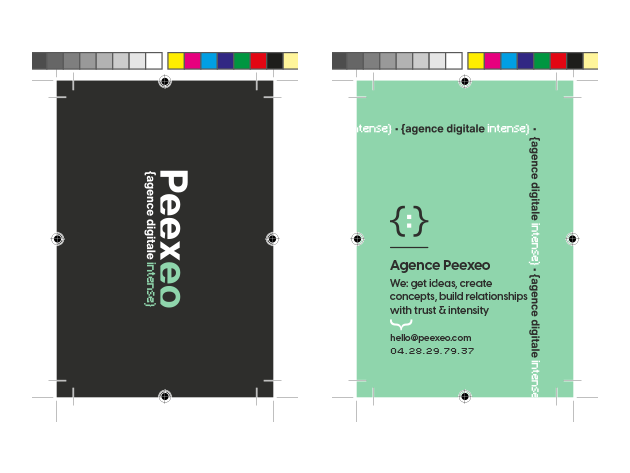
For professional printing, the PDF file must contain print marks such as crop marks, color marks, assembly marks, etc. To facilitate production and finishing, these marks should be printed simultaneously as your document.
Usually, these marks are standardized and added automatically when the PDF is exported from Adobe Indesign and Illustrator. On the other hand, they have to be calculated and added manually from Adobe Photoshop with the utmost precision.
Example below: high-resolution PDF document ready for printing, with print marks set in Indesign or Illustrator (cut lines, assembly marks, colour marks, etc.).
In Adobe InDesign and Illustrator
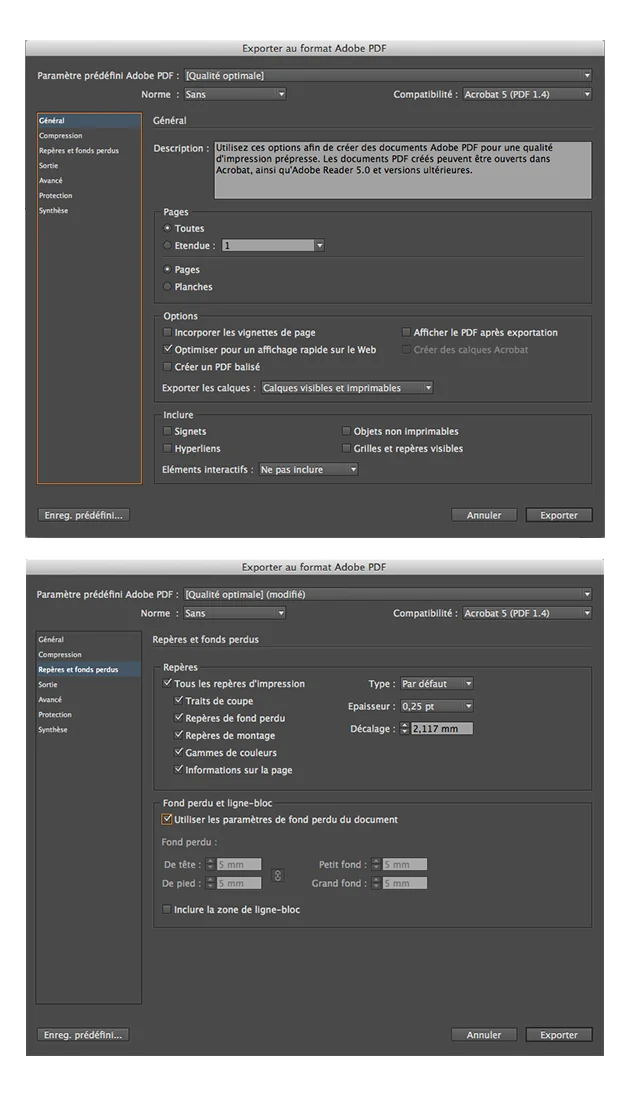
To export your finished document as a prepress PDF, select “File” – “Export” (Indesign) or “File” – “Save as” (Illustrator), choose the “Adobe PDF” format and save.
An “Export / Save Adobe PDF file” dialogue box will then open. In the “General” tab, choose the “Optimal quality” setting and uncheck “Optimise for quick preview of web pages”.
In the “Guides and bleeds” tab, the “All print guides” and “Use document bleed settings” boxes should be ticked.
All that remains is to check in the “Output” tab that the “Colour” destination is “CMYK Document – Coated FOGRA27”, and then save or export the PDF file.
In Adobe Photoshop
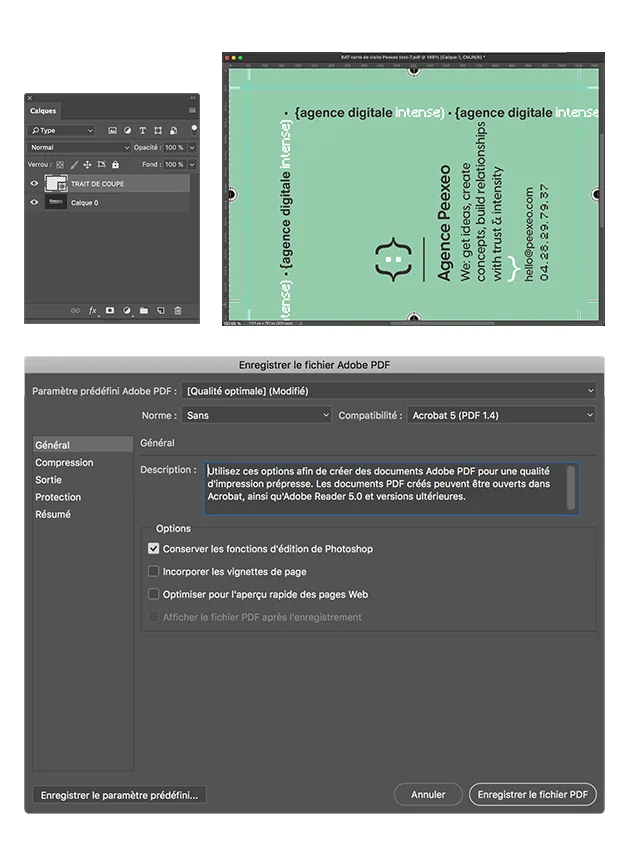
For files created using Photoshop or other software, the crop marks must be added manually. To do this as accurately as possible, place bluish marks in the software 5 mm from the edge. This allows you to view the cut from the “View” – “New marker…” menu. Then simply draw black lines (grade C0 M0 J0 N100) 25 points thick, strictly following the blue markers. Warning: the cutting lines must not cross each other, otherwise, they will be visible on your paper document if the machine shifts during cutting.
Finally, to export your finished document as a prepress PDF, use the “File” – “Save as” menu. Choose the “Photoshop PDF” format and save. (save option: “Proof format: CMYK workspace” and “ICC profile: coated Fogra27” boxes to be ticked).
A “Save Adobe PDF file” dialog box will then open. In the “General” tab, choose the “Optimal quality” setting, uncheck “Optimise for a quick preview of web pages” and save.
Your pre-press files in conclusion
You can’t become a graphic designer or printer with a few Internet tutorials and a few good tips. These two professions require a thorough knowledge of the graphic arts industry and its technical constraints, as well as a general knowledge of communication laws (so as not to forget any legal notice, for example) and the layout conventions laid down by the Imprimerie Française (typographic rules, etc.). Graphic design is a rigorous discipline that requires constant professional monitoring. It is, therefore, a profession in its own right.
These few tips above will help you to produce basic ‘clean’ pre-press files for small-scale projects. However, if in any doubt, you should seek advice from a printer or use the services of an agency. In this way, you can be sure of a high-quality result.
ARE YOU INTERESTED OR DO YOU HAVE QUESTIONS?
Looking to update your communication materials? Send us a message and we’ll be delighted to discuss your project together 🙂


